
How to Fix Water Leakage from the Bonnet of a Delto Kitchen Faucet: A Comprehensive Guide
Tired of that persistent drip, drip, drip coming from your Delto kitchen faucet? A leaky faucet bonnet isn’t just annoying; it can waste water, increase your water bill, and potentially damage your sink and surrounding areas. This comprehensive guide provides a step-by-step, expert-backed approach on how to fix water leakage from the bonnet of a Delto kitchen faucet. We’ll delve into the common causes, necessary tools, and detailed instructions, ensuring you can confidently tackle this plumbing problem yourself. Unlike generic guides, this article focuses specifically on Delto faucets, addressing their unique design and potential quirks. You’ll gain the knowledge and skills to diagnose the issue accurately, perform the necessary repairs safely, and prevent future leaks, saving you time, money, and frustration.
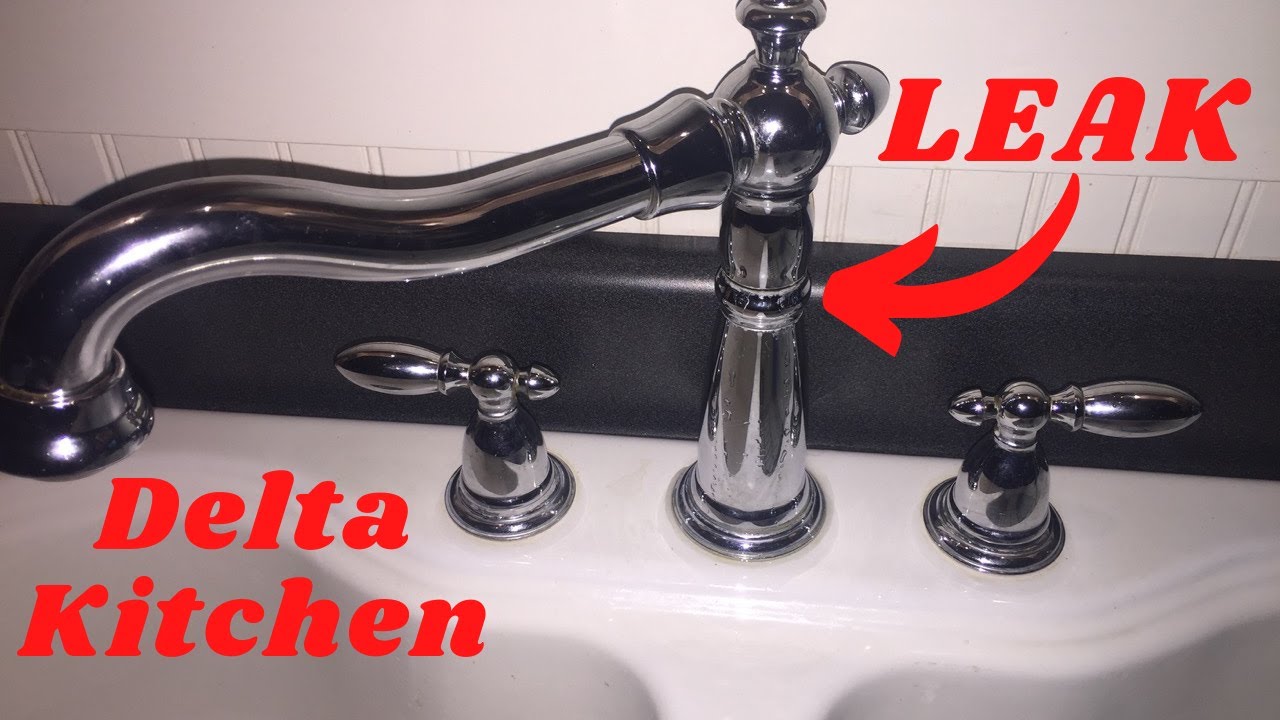
Understanding the Anatomy of a Delto Kitchen Faucet and Bonnet Leaks
Before diving into the repair process, it’s crucial to understand the components involved. A Delto kitchen faucet, like most faucets, comprises several key parts: the spout, handle(s), cartridge or valve, O-rings, and the bonnet. The bonnet is the cap or nut that secures the cartridge or valve within the faucet body. It’s a critical component as it maintains pressure and prevents water from escaping around the cartridge. When this bonnet fails, water leakage is almost inevitable.
What Causes Bonnet Leaks in Delto Faucets?
Several factors can contribute to water leakage from the bonnet of a Delto kitchen faucet:
* Worn-Out O-Rings: O-rings are small, rubber seals that create a watertight barrier between the bonnet and the faucet body. Over time, these O-rings can dry out, crack, or become damaged, leading to leaks.
* Loose Bonnet: The bonnet may loosen due to vibrations or regular use. A loose bonnet allows water to seep through the threads.
* Corrosion: Mineral deposits and corrosion can build up around the bonnet, damaging the threads and creating pathways for water to escape.
* Damaged Bonnet Threads: The threads on the bonnet itself can become stripped or damaged, preventing a tight seal.
* High Water Pressure: Excessively high water pressure can put undue stress on the bonnet and its seals, accelerating wear and tear.
Why is Understanding Your Delto Faucet Important?
Delto faucets, while generally reliable, often feature specific designs and components. Identifying your faucet model can help in sourcing the correct replacement parts and understanding any unique assembly characteristics. Not all faucets are built the same, and knowing the specifics of your Delto model is crucial for a successful repair. According to expert plumbers, identifying the model number is the first step in a smooth repair process.
Essential Tools and Materials for Fixing a Leaky Delto Faucet Bonnet
Before you start, gather the necessary tools and materials. Having everything on hand will streamline the repair process and prevent unnecessary delays. Here’s a comprehensive list:
* Adjustable Wrench: For loosening and tightening the bonnet and other faucet components.
* Screwdrivers (Phillips and Flathead): To remove handles and access internal parts.
* Penetrating Oil: To loosen stubborn or corroded parts.
* New O-Rings: Matching the size and material of the original O-rings. It’s always best to have a variety pack available.
* Plumber’s Grease (Silicone Grease): To lubricate O-rings and prevent future wear.
* Clean Cloths or Rags: For cleaning and drying parts.
* White Vinegar or Descaling Solution: To remove mineral deposits.
* Basin Wrench (Optional): For accessing hard-to-reach nuts under the sink.
* Flashlight: To illuminate dark areas under the sink.
* Small Container: To hold small parts and prevent them from getting lost.
* Delto Faucet Repair Kit (Recommended): If available, a Delto-specific repair kit will contain all the necessary O-rings and parts for your faucet model.
Safety First: Always Turn Off the Water Supply
Before beginning any plumbing repair, it’s absolutely crucial to turn off the water supply to the faucet. Locate the shut-off valves under the sink, typically one for hot water and one for cold water. Turn both valves clockwise until they are completely closed. After turning off the water, turn on the faucet to relieve any remaining pressure in the lines. If you don’t have shut-off valves under the sink, you’ll need to turn off the main water supply to your house.
Step-by-Step Guide: How to Fix Water Leakage from the Bonnet
Follow these detailed steps to fix the water leakage from the bonnet of your Delto kitchen faucet:
1. Prepare the Area: Clear the area around the sink and place a towel or cloth to protect the surface and catch any stray water.
2. Remove the Faucet Handle(s): Depending on your Delto faucet model, the handle(s) may be secured with a screw or simply snap into place. Look for a small set screw on the side or top of the handle. If there’s a screw, loosen it with the appropriate screwdriver and then gently pull the handle off. If there’s no screw, try carefully prying the handle off with a flathead screwdriver, being careful not to scratch the finish.
3. Remove the Decorative Cap (If Applicable): Some Delto faucets have a decorative cap covering the bonnet. This cap may be threaded or snap into place. Unscrew or carefully pry off the cap to access the bonnet.
4. Loosen the Bonnet: Use an adjustable wrench to carefully loosen the bonnet. Turn the wrench counterclockwise. Be prepared for some water to spill out when you loosen the bonnet.
5. Remove the Cartridge or Valve: Once the bonnet is loose, you can remove the cartridge or valve. Note the orientation of the cartridge or valve as you remove it, as it will need to be reinstalled in the same way.
6. Inspect the O-Rings: Carefully examine the O-rings on the cartridge or valve and inside the bonnet. Look for signs of wear, cracking, or damage. Even if the O-rings look intact, they may have lost their elasticity and be unable to create a proper seal.
7. Replace the O-Rings: Use a small pick or screwdriver to carefully remove the old O-rings. Be careful not to scratch the surface of the cartridge or valve. Lubricate the new O-rings with plumber’s grease before installing them. This will help them slide into place and create a better seal. Make sure the new O-rings are properly seated in their grooves.
8. Clean the Bonnet and Faucet Body: Use a clean cloth or rag to remove any mineral deposits or corrosion from the inside of the bonnet and the surrounding area on the faucet body. If necessary, soak the bonnet in white vinegar or a descaling solution to dissolve stubborn deposits. Rinse thoroughly with water.
9. Reassemble the Faucet: Reinstall the cartridge or valve in the correct orientation. Tighten the bonnet with the adjustable wrench, but don’t overtighten it. You want it snug, but not so tight that you damage the threads. Replace the decorative cap (if applicable) and reinstall the handle(s).
10. Turn on the Water Supply: Slowly turn on the water supply valves under the sink. Check for leaks around the bonnet and handle(s). If you see any leaks, tighten the bonnet slightly or double-check that the O-rings are properly seated.
Advanced Troubleshooting: When the Leak Persists
Sometimes, even after replacing the O-rings, the leak may persist. Here are some advanced troubleshooting tips:
* Check for Scratches or Damage: Carefully inspect the cartridge or valve and the inside of the bonnet for any scratches or damage. Even small imperfections can prevent a proper seal. If you find any damage, you may need to replace the cartridge or valve or the bonnet itself.
* Bonnet Thread Damage: If the threads on the bonnet are damaged, it won’t tighten properly. A damaged bonnet needs replacing.
* High Water Pressure: Install a water pressure regulator to reduce the pressure to a safe level. Most homes should have a water pressure between 40 and 60 PSI.
* Incorrect O-Ring Size: Ensure that you are using the correct size and type of O-rings. Refer to the Delto faucet’s parts diagram or contact Delto customer support for assistance.
* Mineral Buildup: If mineral buildup is a recurring problem, consider installing a water softener or filter to reduce the mineral content in your water.
Maintaining Your Delto Kitchen Faucet to Prevent Future Leaks
Proper maintenance can significantly extend the life of your Delto kitchen faucet and prevent future leaks:
* Regular Cleaning: Clean your faucet regularly with a mild soap and water solution. Avoid using abrasive cleaners, as they can damage the finish.
* Lubrication: Periodically lubricate the O-rings with plumber’s grease to keep them supple and prevent them from drying out.
* Check for Leaks: Regularly check for leaks around the bonnet, handle(s), and spout. Address any leaks promptly to prevent further damage.
* Replace Worn Parts: Replace worn O-rings and cartridges or valves as needed.
* Water Pressure: Ensure your water pressure is within the recommended range.
Expert Tip: Keep a log of when you replace parts and perform maintenance on your faucet. This will help you track the lifespan of components and anticipate future repairs.
Delto Faucet Cartridge Replacements: A Closer Look
While this guide focuses on the bonnet, it’s worth noting that the cartridge is another common source of leaks in Delto faucets. The cartridge controls the flow of water, and over time, it can wear out or become damaged. Replacing the cartridge is a relatively straightforward process, similar to replacing the O-rings in the bonnet. The steps are generally the same: turn off the water supply, remove the handle, remove the bonnet, remove the old cartridge, install the new cartridge, and reassemble the faucet. Delto provides specific cartridge replacement instructions for each of their faucet models, which can be found on their website or in the faucet’s documentation.
Advantages of Fixing Your Delto Faucet Yourself
* Cost Savings: Hiring a plumber can be expensive. Fixing the faucet yourself can save you a significant amount of money.
* Convenience: You can fix the faucet on your own schedule, without having to wait for a plumber to become available.
* Satisfaction: There’s a sense of satisfaction that comes from successfully completing a DIY repair.
* Knowledge: You’ll gain valuable knowledge about plumbing and faucet repair.
Potential Drawbacks of DIY Faucet Repair
* Time Commitment: DIY repairs can take time, especially if you’re not experienced.
* Risk of Damage: If you’re not careful, you could damage the faucet or other plumbing components.
* Complexity: Some faucet repairs can be complex and require specialized tools or knowledge.
* Warranty Issues: DIY repairs may void the faucet’s warranty.
Comprehensive Review: Delto Faucet Repair Kits
Delto offers repair kits specifically designed for their faucets. These kits typically include a variety of O-rings, cartridges, and other replacement parts. Using a Delto repair kit ensures that you have the correct parts for your faucet model, making the repair process easier and more reliable. Here’s a balanced review of these kits:
Pros:
* Correct Parts: The kits contain the correct parts for your Delto faucet model, eliminating the guesswork of finding the right O-rings or cartridges.
* Convenience: Everything you need for the repair is included in one package.
* Cost-Effective: Buying a kit is often more cost-effective than buying individual parts.
* Instructions: The kits typically include detailed instructions for the repair process.
* Peace of Mind: Using a Delto repair kit ensures that you’re using genuine Delto parts, which can help maintain the faucet’s performance and longevity.
Cons:
* Availability: Delto repair kits may not be available for all faucet models.
* Cost: The kits can be more expensive than buying individual parts.
* Overkill: You may not need all the parts included in the kit.
Overall Verdict: Delto faucet repair kits are a convenient and reliable option for fixing leaks and other faucet problems. While they may be more expensive than buying individual parts, the convenience and peace of mind they offer can be worth the extra cost. We recommend checking if a kit is available for your specific Delto faucet model before starting the repair process.
Alternatives to Delto Faucet Repair Kits
If a Delto repair kit isn’t available for your faucet model, or if you prefer to buy individual parts, here are some alternatives:
* Generic O-Ring Kits: These kits contain a variety of O-rings in different sizes and materials. However, it can be difficult to find the exact size and material you need for your Delto faucet.
* Individual Replacement Parts: You can buy individual O-rings, cartridges, and other parts from plumbing supply stores or online retailers. This option allows you to get exactly what you need, but it requires more research and effort.
Insightful Q&A: Addressing Common Delto Faucet Leak Concerns
Q1: How do I identify the exact model number of my Delto kitchen faucet?
A: Look for a sticker or stamp on the faucet body, often located under the sink or on the faucet’s packaging. The model number is crucial for sourcing the correct replacement parts.
Q2: What type of grease should I use on the O-rings?
A: Use plumber’s grease, also known as silicone grease. This type of grease is specifically designed for plumbing applications and is safe for use with rubber and plastic components.
Q3: Can I use Teflon tape instead of plumber’s grease on the bonnet threads?
A: No, Teflon tape is not recommended for the bonnet threads. Plumber’s grease is the preferred lubricant for O-rings and other faucet components.
Q4: How often should I replace the O-rings in my Delto faucet?
A: Replace the O-rings every 2-3 years, or sooner if you notice any leaks.
Q5: What if the bonnet is stuck and I can’t loosen it?
A: Apply penetrating oil to the bonnet threads and let it sit for a few minutes. Then, try loosening the bonnet again with the adjustable wrench. If it’s still stuck, you may need to use a basin wrench to get more leverage.
Q6: Can I use a pipe wrench to loosen the bonnet?
A: No, avoid using a pipe wrench, as it can damage the faucet’s finish and potentially crush the bonnet. Use an adjustable wrench instead.
Q7: What should I do if I strip the threads on the bonnet?
A: If you strip the threads on the bonnet, you’ll need to replace the bonnet. You may also need to replace the faucet body if the threads on the faucet body are also damaged.
Q8: Is it safe to use a chemical descaler on my Delto faucet?
A: Use chemical descalers with caution, as they can damage the faucet’s finish. Always follow the manufacturer’s instructions and test the descaler on an inconspicuous area first.
Q9: My Delto faucet is leaking from the base. Is this related to the bonnet?
A: A leak at the base could be related to the O-rings or connections at the base of the faucet, separate from the bonnet itself. Check the connections and seals at the base and replace any worn parts.
Q10: Where can I find a parts diagram for my specific Delto faucet model?
A: Check the Delto website or contact their customer support. Having the parts diagram will ensure you order the correct replacement parts.
Conclusion: Taking Control of Your Delto Faucet Repairs
Fixing water leakage from the bonnet of a Delto kitchen faucet may seem daunting, but with the right tools, knowledge, and a step-by-step approach, it’s a manageable DIY project. By understanding the causes of leaks, following our detailed instructions, and performing regular maintenance, you can keep your Delto faucet in top condition and avoid costly plumbing repairs. Remember to prioritize safety by turning off the water supply before starting any work. We’ve shared our experience, expert insights, and potential pitfalls to empower you. Now you can confidently troubleshoot and address leaks, saving money and preventing water waste. Share your experiences with fixing your Delto faucet in the comments below! Explore our other guides for more plumbing tips and tricks.
