
Find Leak in One Handle Kitchen Sink Faucet: A Comprehensive Guide to Diagnosis and Repair
Is that persistent drip-drip-drip driving you crazy? A leaky one-handle kitchen sink faucet is a common household nuisance, but thankfully, it’s often a problem you can tackle yourself. This comprehensive guide will walk you through the process of how to find leak in one handle kitchen sink faucet, diagnose the cause, and implement effective solutions. We’ll cover everything from identifying the source of the leak to step-by-step repair instructions, ensuring you can restore your faucet to its leak-free glory. Our goal is to provide you with the most trustworthy, expert, and actionable advice, saving you time, money, and the frustration of a constantly dripping faucet.
Understanding the Anatomy of a One-Handle Kitchen Sink Faucet
Before diving into the troubleshooting process, it’s essential to understand the basic components of a one-handle kitchen sink faucet. Familiarizing yourself with these parts will make diagnosing the leak much easier.
* **Handle:** Controls the water flow and temperature.
* **Spout:** The curved or angled part through which water flows.
* **Aerator:** Screws onto the spout to mix air with the water, creating a smoother flow and reducing splashing.
* **Cartridge:** The heart of a one-handle faucet, controlling the mixing of hot and cold water. Cartridges are often the culprit behind leaks.
* **O-Rings:** Small rubber rings that create a watertight seal between various faucet components.
* **Diverter:** Directs water flow to the spout or sprayer (if your faucet has one).
* **Supply Lines:** Flexible hoses that connect the faucet to the hot and cold water supply valves.
* **Mounting Hardware:** Nuts and washers that secure the faucet to the sink.
Knowing these components will aid in your ability to find leak in one handle kitchen sink faucet effectively.
Common Causes of Leaks in One-Handle Kitchen Sink Faucets
Leaks in one-handle kitchen sink faucets can stem from various issues. Identifying the root cause is crucial for effective repair. Here are some of the most common culprits:
* **Worn-Out Cartridge:** This is the most frequent cause of leaks in one-handle faucets. Over time, the cartridge can wear down, crack, or become clogged with mineral deposits, leading to drips.
* **Damaged O-Rings:** O-rings provide seals between faucet components. As they age, they can become brittle, cracked, or flattened, causing leaks around the spout or handle.
* **Loose Connections:** The connections between the supply lines and the faucet body can loosen over time, resulting in leaks. Similarly, the mounting hardware securing the faucet to the sink can also loosen.
* **Corroded Valve Seats:** Valve seats are the areas where the cartridge seals against the faucet body. Corrosion or mineral buildup on the valve seats can prevent a tight seal, leading to leaks.
* **High Water Pressure:** Excessively high water pressure can put stress on faucet components, accelerating wear and tear and increasing the likelihood of leaks.
* **Defective Faucet Body:** In rare cases, the faucet body itself may have a crack or defect that causes a leak.
Understanding these common issues is key to efficiently find leak in one handle kitchen sink faucet.
Step-by-Step Guide: How to Find Leak in One Handle Kitchen Sink Faucet
Now, let’s get down to the nitty-gritty of how to find leak in one handle kitchen sink faucet. Follow these steps to systematically identify the source of the leak:
**Step 1: Preparation and Safety**
* **Turn Off the Water Supply:** Locate the shut-off valves under your sink. There should be one for hot water and one for cold water. Turn both valves clockwise until they are completely closed. If you don’t have individual shut-off valves, you’ll need to turn off the main water supply to your house.
* **Protect Your Work Area:** Place a towel or bucket under the sink to catch any drips or spills.
* **Gather Your Tools:** You’ll need a few basic tools, including a screwdriver (Phillips and flathead), an adjustable wrench, pliers, a basin wrench (optional), and penetrating oil.
**Step 2: Visual Inspection**
* **Check the Spout:** Carefully inspect the base of the spout where it meets the faucet body. Look for any signs of water leaking, corrosion, or mineral buildup.
* **Examine the Handle:** Check around the base of the handle for leaks. Operate the handle to see if the leak worsens in certain positions.
* **Inspect the Supply Lines:** Look for leaks or dampness around the connections between the supply lines and the faucet body. Also, check the supply lines themselves for cracks or damage.
* **Feel Under the Sink:** Reach under the sink and feel around the faucet body and connections for any signs of moisture. Use a flashlight to get a better view of hard-to-reach areas.
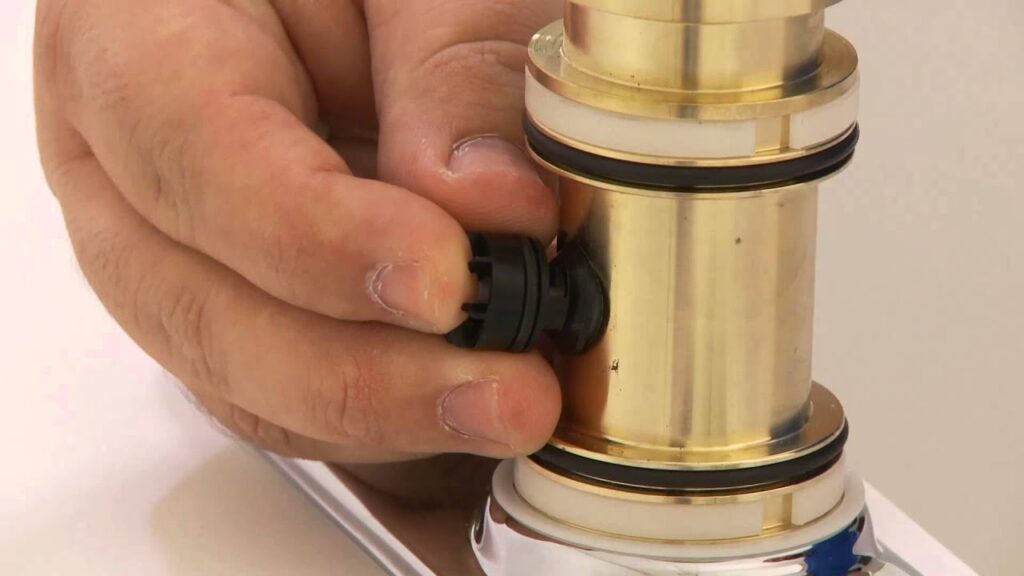
**Step 3: Cartridge Inspection**
* **Remove the Handle:** Depending on your faucet model, you may need to pry off a decorative cap to access the handle screw. Use a small flathead screwdriver to gently pry off the cap. Then, use a Phillips head screwdriver to remove the handle screw.
* **Remove the Cartridge Retaining Clip:** Once the handle is removed, you’ll see a cartridge retaining clip. Use pliers or a small screwdriver to carefully remove the clip. Be careful not to lose it!
* **Remove the Cartridge:** Gently pull the cartridge straight up and out of the faucet body. If it’s stuck, try wiggling it gently from side to side while pulling. You may need to use penetrating oil to loosen it.
* **Inspect the Cartridge:** Examine the cartridge for cracks, wear, or mineral buildup. If the cartridge is damaged, it needs to be replaced.
**Step 4: O-Ring Inspection**
* **Locate the O-Rings:** There are typically one or more O-rings located on the faucet body or around the spout.
* **Inspect the O-Rings:** Examine the O-rings for cracks, wear, or flattening. If the O-rings are damaged, they need to be replaced.
**Step 5: Valve Seat Inspection**
* **Locate the Valve Seats:** The valve seats are located inside the faucet body, where the cartridge seals against them.
* **Inspect the Valve Seats:** Use a flashlight to inspect the valve seats for corrosion or mineral buildup. If the valve seats are corroded, you may need to clean them with a valve seat wrench or replace the entire faucet.
By following these steps, you should be able to pinpoint the source of the leak. This targeted approach makes it easier to find leak in one handle kitchen sink faucet.
Tools and Materials You’ll Need
Before you start any repairs, make sure you have the necessary tools and materials on hand. This will save you time and frustration. Here’s a list of essentials:
* **Screwdrivers:** Phillips and flathead
* **Adjustable Wrench:** For tightening and loosening nuts and bolts
* **Pliers:** For gripping and manipulating small parts
* **Basin Wrench (Optional):** For reaching hard-to-access nuts under the sink
* **Penetrating Oil:** To loosen stuck parts
* **New Cartridge:** If the cartridge is the source of the leak
* **New O-Rings:** If the O-rings are the source of the leak
* **Plumber’s Grease:** To lubricate O-rings and cartridges
* **Clean Cloths or Rags:** For cleaning up spills
* **Bucket or Towel:** To catch drips and spills
Having these tools ready makes it easier to find leak in one handle kitchen sink faucet and repair it.
Repairing a Leaky One-Handle Kitchen Sink Faucet: Step-by-Step Instructions
Once you’ve identified the source of the leak, you can begin the repair process. Here are step-by-step instructions for some common repairs:
**Replacing a Worn-Out Cartridge**
1. **Turn Off the Water Supply:** As mentioned earlier, turn off the hot and cold water supply valves under the sink.
2. **Remove the Handle:** Remove the handle screw and the handle.
3. **Remove the Cartridge Retaining Clip:** Remove the retaining clip that holds the cartridge in place.
4. **Remove the Old Cartridge:** Gently pull the old cartridge straight up and out of the faucet body.
5. **Install the New Cartridge:** Lubricate the new cartridge with plumber’s grease and insert it into the faucet body. Make sure it’s properly aligned.
6. **Reinstall the Retaining Clip:** Reinstall the retaining clip to secure the cartridge in place.
7. **Reinstall the Handle:** Reinstall the handle and tighten the handle screw.
8. **Turn On the Water Supply:** Slowly turn on the hot and cold water supply valves and check for leaks.
**Replacing Damaged O-Rings**
1. **Turn Off the Water Supply:** Turn off the hot and cold water supply valves under the sink.
2. **Disassemble the Faucet:** Disassemble the faucet to access the O-rings that need to be replaced. This may involve removing the spout, handle, or other components.
3. **Remove the Old O-Rings:** Use a small screwdriver or pick to carefully remove the old O-rings.
4. **Install the New O-Rings:** Lubricate the new O-rings with plumber’s grease and install them in the correct positions.
5. **Reassemble the Faucet:** Reassemble the faucet, making sure all components are properly aligned and tightened.
6. **Turn On the Water Supply:** Slowly turn on the hot and cold water supply valves and check for leaks.
**Tightening Loose Connections**
1. **Turn Off the Water Supply:** Turn off the hot and cold water supply valves under the sink.
2. **Tighten the Connections:** Use an adjustable wrench to tighten any loose connections between the supply lines and the faucet body. Also, tighten the mounting hardware that secures the faucet to the sink.
3. **Turn On the Water Supply:** Slowly turn on the hot and cold water supply valves and check for leaks.
By following these detailed instructions, you can effectively find leak in one handle kitchen sink faucet and repair it.
Preventing Future Leaks: Maintenance Tips
Prevention is always better than cure. Here are some maintenance tips to help prevent future leaks in your one-handle kitchen sink faucet:
* **Regular Cleaning:** Clean your faucet regularly to remove mineral deposits and grime. Use a mild soap and water solution and a soft cloth.
* **Lubricate Moving Parts:** Periodically lubricate the moving parts of your faucet, such as the cartridge and O-rings, with plumber’s grease.
* **Check for Leaks Regularly:** Inspect your faucet for leaks on a regular basis. The sooner you catch a leak, the easier it will be to repair.
* **Control Water Pressure:** If your water pressure is excessively high, consider installing a pressure regulator to protect your faucet and other plumbing fixtures.
* **Use Quality Parts:** When replacing faucet components, always use high-quality parts that are designed for your specific faucet model.
By following these maintenance tips, you can extend the life of your faucet and prevent future leaks. Taking preventative steps helps to avoid the need to find leak in one handle kitchen sink faucet in the first place.
When to Call a Plumber
While many faucet repairs can be done yourself, there are some situations where it’s best to call a professional plumber. Here are some scenarios where professional help is recommended:
* **You’re Not Comfortable with DIY Repairs:** If you’re not comfortable working with plumbing or you’re unsure about any of the repair steps, it’s best to call a plumber.
* **The Leak is Severe:** If the leak is severe or you can’t identify the source of the leak, a plumber can diagnose the problem and perform the necessary repairs.
* **You’ve Tried Repairing the Faucet Yourself, But the Leak Persists:** If you’ve tried repairing the faucet yourself, but the leak continues, there may be a more complex problem that requires professional attention.
* **You Have Old or Corroded Plumbing:** If you have old or corroded plumbing, it’s best to have a plumber inspect your plumbing system and make any necessary repairs.
Knowing when to call a professional can save you time, money, and potential headaches. A plumber has the experience and expertise to properly find leak in one handle kitchen sink faucet when the problem is more complex.
Understanding Cartridge Types and Compatibility
One crucial aspect of repairing a one-handle kitchen sink faucet is understanding the different types of cartridges and ensuring compatibility. Not all cartridges are created equal, and using the wrong one can lead to continued leaks or even damage to the faucet. There are four main types of cartridges commonly found in one-handle faucets:
* **Ball Cartridges:** These cartridges feature a slotted ball that controls water flow and temperature. They are identifiable by their multiple springs and rubber seats.
* **Ceramic Disc Cartridges:** These cartridges use two ceramic discs that slide against each other to control water flow. They are known for their durability and resistance to wear.
* **Sleeve Cartridges:** These cartridges use a rubber sleeve that moves up and down to control water flow. They are less common than ball or ceramic disc cartridges.
* **Diamond Cartridges:** A more recent innovation, diamond cartridges use a diamond-coated ceramic disc for enhanced durability and smooth operation.
When replacing a cartridge, it’s essential to identify the correct type and ensure that the new cartridge is compatible with your faucet model. Check the faucet manufacturer’s website or consult a plumbing supply store to find the correct replacement cartridge. Using the wrong cartridge can lead to improper sealing and continued leaks. Understanding cartridge types is an essential part of knowing how to find leak in one handle kitchen sink faucet and fix it.
Advanced Troubleshooting Techniques for Persistent Leaks
Sometimes, despite your best efforts, a leak may persist even after replacing the cartridge or O-rings. In such cases, more advanced troubleshooting techniques may be required. Here are some additional steps you can take:
* **Check for Scratches or Damage on the Faucet Body:** Carefully inspect the inside of the faucet body for any scratches, cracks, or damage that could be preventing a tight seal. If you find any damage, the faucet may need to be replaced.
* **Clean the Valve Seats Thoroughly:** Even if the valve seats appear to be in good condition, they may still have microscopic mineral deposits or corrosion that is preventing a proper seal. Use a valve seat wrench or a specialized cleaning tool to thoroughly clean the valve seats.
* **Apply Silicone Grease to the Cartridge and O-Rings:** Silicone grease provides a better seal than plumber’s grease and can help to prevent leaks. Apply a thin layer of silicone grease to the cartridge and O-rings before installing them.
* **Check the Water Pressure:** High water pressure can put excessive stress on faucet components and cause leaks. Use a water pressure gauge to check your water pressure and install a pressure regulator if necessary.
These advanced techniques can help you to identify and resolve persistent leaks. Employing these methods shows a deeper understanding of how to find leak in one handle kitchen sink faucet.
The Importance of Water Conservation
A leaky faucet not only causes frustration but also wastes a significant amount of water. Even a small drip can add up to gallons of wasted water over time, leading to higher water bills and a negative impact on the environment. Addressing a leaky faucet promptly is an essential step towards water conservation. Here’s why water conservation is so important:
* **Saves Money:** Reducing water consumption lowers your water bill, saving you money each month.
* **Conserves Resources:** Water is a precious resource, and conserving it helps to protect our environment.
* **Reduces Energy Consumption:** Treating and distributing water requires energy. Conserving water reduces energy consumption and lowers greenhouse gas emissions.
* **Protects Ecosystems:** Over-extraction of water can harm ecosystems and wildlife. Conserving water helps to protect these valuable resources.
By fixing a leaky faucet and adopting other water-saving habits, you can make a positive impact on the environment and your wallet. Prompt action to find leak in one handle kitchen sink faucet is environmentally and financially responsible.
Choosing a New Faucet: Key Considerations
If your faucet is beyond repair or you’re simply looking to upgrade, choosing a new faucet can seem daunting. Here are some key considerations to keep in mind:
* **Style and Finish:** Choose a faucet that complements your kitchen décor. Consider the style (e.g., modern, traditional, farmhouse) and the finish (e.g., chrome, stainless steel, brushed nickel).
* **Functionality:** Think about your specific needs and choose a faucet with the features that are most important to you. Consider features such as a pull-down sprayer, a high-arc spout, or touchless operation.
* **Durability:** Look for a faucet made from high-quality materials, such as solid brass or stainless steel. Check for a warranty to ensure that the faucet is built to last.
* **Ease of Installation:** Consider the ease of installation. Some faucets are easier to install than others, especially if you’re planning to do it yourself.
* **Water Efficiency:** Look for a faucet with a low-flow aerator to conserve water. WaterSense-labeled faucets meet EPA standards for water efficiency.
Choosing the right faucet can enhance the functionality and aesthetics of your kitchen. Prioritize quality and water efficiency when selecting a new faucet.
Q&A: Expert Answers to Common Faucet Leak Questions
Here are some insightful answers to frequently asked questions about leaky faucets:
**Q1: Why does my one-handle faucet only leak when the handle is in a certain position?**
A1: This often indicates a worn or damaged cartridge. The position of the handle affects the alignment of the cartridge’s internal components, which can exacerbate the leak when the worn area is engaged.
**Q2: Can hard water cause my faucet to leak?**
A2: Yes, hard water contains minerals that can build up inside the faucet, particularly around the cartridge and valve seats. This buildup can prevent a tight seal and lead to leaks.
**Q3: How often should I replace the cartridge in my one-handle faucet?**
A3: There’s no set timeframe, as it depends on water quality and usage. However, if you notice a persistent drip or difficulty controlling water temperature, it’s likely time to replace the cartridge.
**Q4: Is it possible to repair a faucet leak without turning off the water supply?**
A4: While technically possible in some very limited situations, it’s highly discouraged. Working on a faucet under pressure is dangerous and can lead to flooding and further damage. Always turn off the water supply before starting any repairs.
**Q5: What’s the best way to remove mineral deposits from a faucet?**
A5: A solution of equal parts white vinegar and water is often effective. Soak the affected parts (like the aerator) in the solution for a few hours, then scrub with a soft brush.
**Q6: My faucet is leaking from the base of the spout. What’s likely the cause?**
A6: This is often due to worn or damaged O-rings located around the spout. Replacing these O-rings should resolve the issue.
**Q7: Can I use any type of lubricant on faucet parts?**
A7: No, it’s crucial to use plumber’s grease or silicone grease specifically designed for plumbing applications. Other lubricants can damage rubber components or contaminate the water supply.
**Q8: Why is my brand-new faucet leaking?**
A8: While rare, new faucets can sometimes have manufacturing defects or be damaged during installation. Check all connections and ensure the cartridge is properly seated. If the leak persists, contact the manufacturer for a replacement.
**Q9: What is a valve seat wrench and when would I use it?**
A9: A valve seat wrench is a specialized tool used to remove and clean valve seats inside the faucet body. You would use it if you suspect corrosion or mineral buildup on the valve seats is causing a leak.
**Q10: How do I know if my water pressure is too high?**
A10: You can purchase a water pressure gauge at most hardware stores and attach it to an outdoor faucet. A reading above 80 PSI is generally considered too high and may require a pressure regulator.
Conclusion: Stop the Drip and Save!
A leaky one-handle kitchen sink faucet is a common problem, but with the right knowledge and tools, it’s often a problem you can solve yourself. By following the steps outlined in this comprehensive guide, you can effectively find leak in one handle kitchen sink faucet, diagnose the cause, and implement effective repairs. Remember to prioritize safety, use quality parts, and don’t hesitate to call a plumber if you’re unsure about any aspect of the repair process. By taking action, you’ll not only stop the annoying drip but also save water, money, and contribute to a more sustainable future. Now that you’re armed with this expert knowledge, why not share your experiences or ask any further questions in the comments below? Or, if you’re ready to tackle some more home improvement projects, explore our related guides on plumbing maintenance and water conservation!
